Radiator Leak Diagnostic Tool
Step 1: Where do you see the fluid?
Step 2: What does it look like?
Diagnosis Result
Leak Title
Description goes here.
Estimated Cost Range
There is nothing quite as panic-inducing as seeing a puddle of bright green or orange fluid under your car after you’ve parked it. If your dashboard temperature gauge is creeping into the red zone, you know exactly what’s happening: your cooling system has failed. But before you rush to a mechanic and hand over your wallet, it helps to know where that leak is actually coming from. Understanding where do radiators usually leak from can save you time, money, and potentially the life of your engine.
Radiators don’t just fail randomly. They wear out in specific patterns based on physics, chemistry, and simple age. By knowing the common failure points, you can diagnose the issue yourself or at least have a smarter conversation with your mechanic. Let’s look at the anatomy of a leak.
The Core Tubes: The Most Common Failure Point
If you had to bet on one spot, put your money on the core itself. The core is made up of hundreds of tiny, thin-walled aluminum or copper tubes sandwiched between cooling fins. Over time, these tubes suffer from two main enemies: corrosion and vibration.
Aluminum, which is used in most modern cars since the late 1990s, is lightweight but susceptible to internal corrosion if the coolant isn't changed regularly. Rust eats away from the inside out. Eventually, a pinhole forms. When this happens, you might see a slow drip from the bottom center of the radiator. It’s often hard to spot because the fluid drips directly onto the ground, mixing with road grime.
Vibration is the other killer. If your car drives over potholes daily, those microscopic impacts travel through the chassis and into the radiator mounts. Over years, this constant shaking can fatigue the metal joints where the tubes connect to the side tanks, causing cracks to form right in the middle of the unit.
The Side Tanks: Plastic vs. Metal Weaknesses
Modern radiators are hybrid beasts. While the core is metal, the top and bottom reservoirs-known as side tanks-are almost always made of plastic. These tanks hold the bulk of the coolant volume and distribute it into the core tubes.
Plastic degrades faster than metal. Heat cycles (heating up and cooling down) cause the plastic to expand and contract repeatedly. This thermal stress leads to brittleness. You’ll often find hairline cracks near the corners of the tank or along the seams where the plastic was molded together.
A telltale sign of a side tank leak is that it’s usually visible. Look at the edges of your radiator. If you see white crusty residue or wet spots on the plastic surface, that’s your culprit. Unlike core leaks, tank leaks are often easier to patch temporarily with epoxy, though replacement is the only permanent fix.
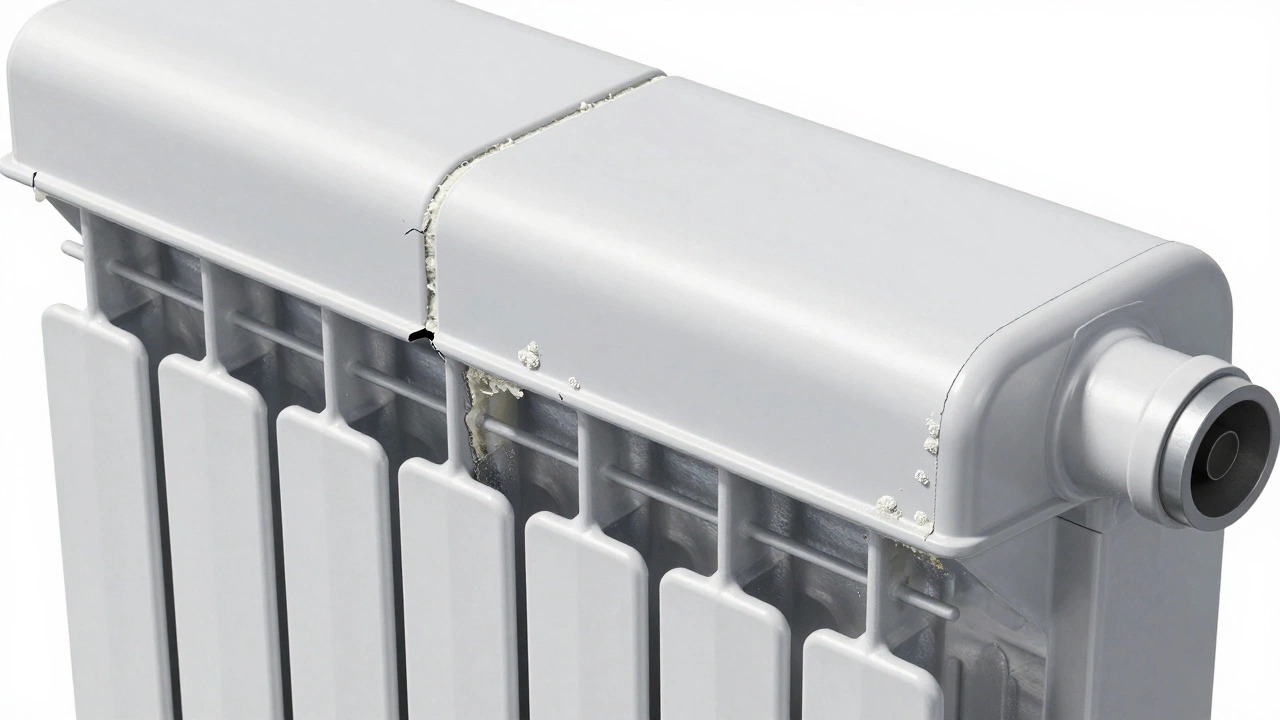
The Tank-to-Core Seams: Where Two Materials Meet
This is arguably the most frequent source of leaks in vehicles older than five years. The side tanks are bonded to the metal core using an adhesive sealant. This bond has to withstand high pressure (usually around 15 psi) and extreme temperatures.
As the plastic tanks shrink slightly due to heat aging and the metal core expands, the glue holding them together starts to fail. You will typically see leakage running down the vertical sides of the radiator, right where the plastic meets the metal fins. It looks like sweat running down the side of the unit. This is a classic sign that the structural integrity of the radiator assembly is compromised.
Coolant Hoses and Clamps: The Easy Fixes
Before you blame the radiator itself, check the connections. The upper and lower hoses carry hot coolant to and from the engine block. These rubber hoses degrade over time, becoming hard, cracked, or swollen.
- Hose Swelling: If a hose feels spongy or bulges when squeezed, the inner lining is failing. Coolant seeps through the porous rubber, creating a damp mess around the clamp.
- Clamp Failure: Spring clamps lose tension over time. Screw-type clamps can rust in place, preventing them from sealing tightly against the hose barb.
- Hose Barb Cracks: The metal necks on the radiator where hoses attach can crack, especially if the hose was forced on unevenly during previous repairs.
A leak here is dangerous because it’s close to moving parts like belts and fans. If coolant sprays onto a hot exhaust manifold, it creates steam instantly, masking the actual source of the problem.
The Overflow Tank and Cap: Pressure Regulation Issues
Your cooling system is sealed, but it needs a way to handle expansion. That’s the job of the overflow tank (or expansion tank) and the radiator cap. If you’re losing coolant but see no puddle under the car, the leak might be atmospheric.
A faulty radiator cap fails to hold pressure. Without proper pressure, the boiling point of the coolant drops. Instead of leaking liquid, the system boils off coolant as vapor. You might notice a sweet smell from the engine bay or see steam, but no dripping fluid. Similarly, cracks in the plastic overflow tank are common. These tanks sit exposed to road debris and UV light, making them prone to splitting.
Water Pump Weep Hole: Often Mistaken for a Radiator Leak
Many drivers assume any front-end coolant leak comes from the radiator. However, the water pump is driven by the same belt system and sits adjacent to the radiator hoses. The water pump has a mechanical seal that keeps coolant inside. When this seal wears out, coolant escapes through a designated "weep hole" designed to warn you of failure.
If you see coolant dripping from the front-center of the engine, just below the serpentine belt, it’s likely the water pump, not the radiator. Ignoring this can lead to catastrophic bearing failure in the pump, taking the timing belt or chain with it in many interference engines.
| Leak Location | Typical Cause | Visual Symptom | Repair Difficulty |
|---|---|---|---|
| Core Tubes | Internal corrosion / Vibration | Drip from bottom center; hard to see | High (Replace Unit) |
| Side Tanks | Plastic brittleness / Thermal stress | Cracks on plastic edges; white residue | Medium (Patch or Replace) |
| Tank-to-Core Seam | Adhesive failure | Sweating down the vertical sides | High (Replace Unit) |
| Hose Connections | Rubber degradation / Loose clamps | Dampness around hose clamps | Low (Replace Hose/Clamp) |
| Radiator Cap | Spring fatigue / Seal wear | No puddle; steam / low level only | Low (Replace Cap) |
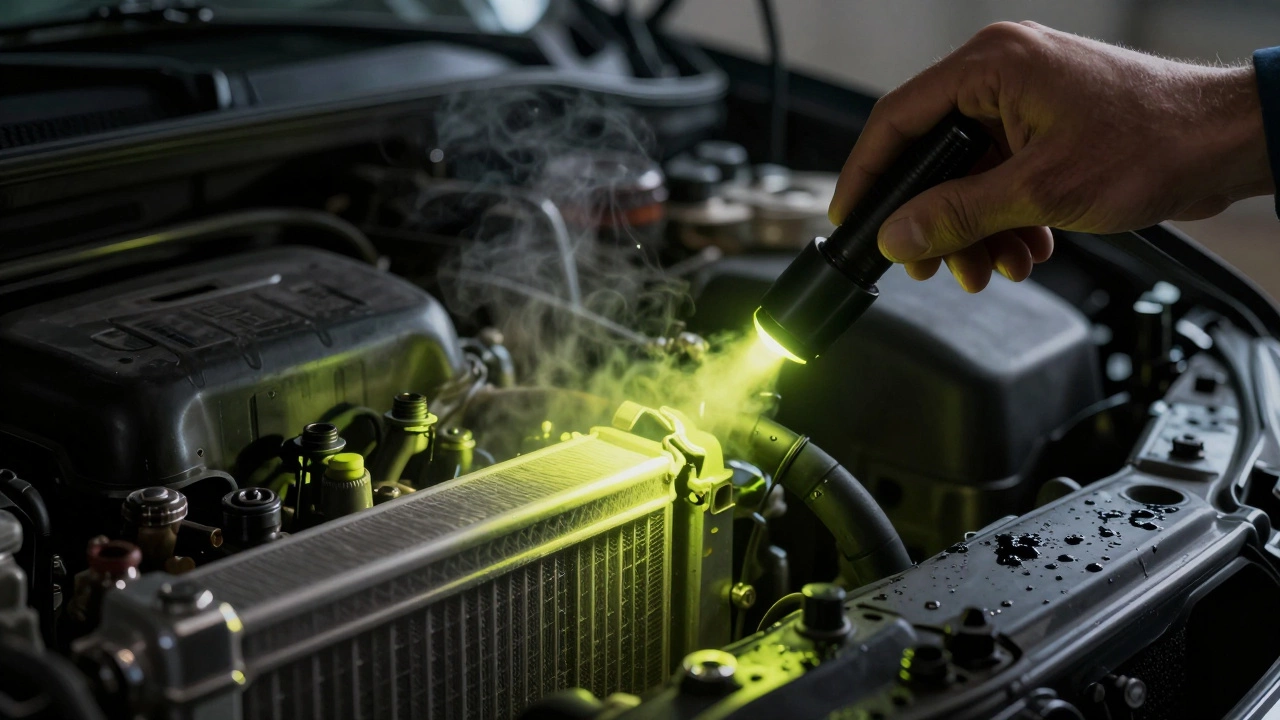
How to Diagnose the Source Yourself
You don’t need a degree in engineering to find a leak. Start with a visual inspection. Clean the underside of the radiator with a degreaser so new leaks stand out. Run the engine until it reaches operating temperature. Use a flashlight to inspect the seams, hoses, and tanks while the engine is running.
For stubborn leaks, mechanics use a UV dye test. You add a fluorescent dye to the coolant, drive the car for a short distance, and then use a blacklight to pinpoint the exact origin of the glow. This is particularly useful for weeping seals or small core holes that aren’t visibly dripping.
Remember, ignoring a small leak is a gamble with your engine. Overheating can warp cylinder heads and blow head gaskets, turning a £100 radiator repair into a £1,500 engine rebuild. Addressing the root cause early is always the cheaper option.
Can I fix a radiator leak myself?
Minor leaks in hoses or clamps can often be fixed by tightening or replacing the components. Small cracks in plastic tanks can sometimes be patched with specialized epoxy kits, but this is a temporary measure. Leaks in the metal core or major seam failures require professional welding or complete radiator replacement, which is best left to experts.
What color is radiator coolant?
Coolant colors vary by manufacturer and chemical composition. Common colors include bright green (traditional ethylene glycol), orange/yellow (OAT - Organic Acid Technology), pink/purple (HOAT - Hybrid OAT), and blue. Never mix different colored coolants as they may contain incompatible additives that can cause sludge and further leaks.
Why does my radiator leak only when the engine is hot?
Heat causes materials to expand. A small crack or weak seal may remain closed when the engine is cold but open up as the metal and plastic expand during operation. Additionally, higher pressure builds up in the cooling system when hot, forcing coolant through even the tiniest openings.
Is it safe to drive with a leaking radiator?
No. Driving with a leaking radiator risks severe engine overheating. Even a slow leak can lead to sudden coolant loss, causing the engine to seize or warp critical components like the cylinder head. If you notice a leak, stop driving and arrange for immediate repair.
How much does it cost to replace a car radiator?
Costs vary widely depending on the vehicle make and model. For a standard family car, a new radiator typically costs between £150 and £400 including labor. Luxury or performance vehicles can exceed £800. Always factor in the cost of flushing the old coolant and refilling the system with fresh fluid.