Brake Pad Thickness Checker
Check Your Brake Pad Safety
Enter the measured thickness of your brake pads to determine if replacement is needed. Most manufacturers recommend replacing pads when thickness reaches 3mm or less.
Wondering whether your brake pads need replacing? Ignoring worn pads can turn a routine stop into a safety nightmare. The good news is you don’t need a lift or a lot of tools to find out. In the next few minutes you’ll learn the exact signs to watch for, how to inspect the pads with just a flashlight, and when it’s time to hand the job over to a professional.
Why Brake Pad Wear Matters
Brake pads are the friction material that presses against the Brake Disc (also called a rotor) to slow the wheels. As the pads wear down, the distance between the pad and the disc grows, meaning the caliper has to move further to create the same stopping force. This extra travel can lead to a soft pedal, longer stopping distances, and in extreme cases, metal‑on‑metal contact that can damage the disc and cost hundreds of pounds to fix.
Key Signs Your Brake Pads Need Replacing
Even if you haven’t felt a change in pedal feel, there are a few unmistakable clues that the pads are close to the end of their life:
- Squealing or screeching noise - a high‑pitched sound that fades when you apply the brakes firmly is usually a wear indicator built into the pad.
- Grinding metal sound - indicates the pad material is gone and the backing plate is scraping the disc.
- Reduced braking performance - the pedal feels softer or you need to press farther to slow down.
- Vibration or pulsation - a warped disc can cause the steering wheel to shake when braking.
- Visual wear - you can see the pad thickness through the wheel spokes.
If any of these pop up, grab a flashlight and take a quick look.
DIY Inspection Steps
- Park on a flat surface, engage the handbrake, and turn off the engine.
- Remove the wheel lug nuts (usually four) with a cross‑dot socket. You don’t need to take the wheel off completely; just loosen enough to swing the wheel outward for a clear view.
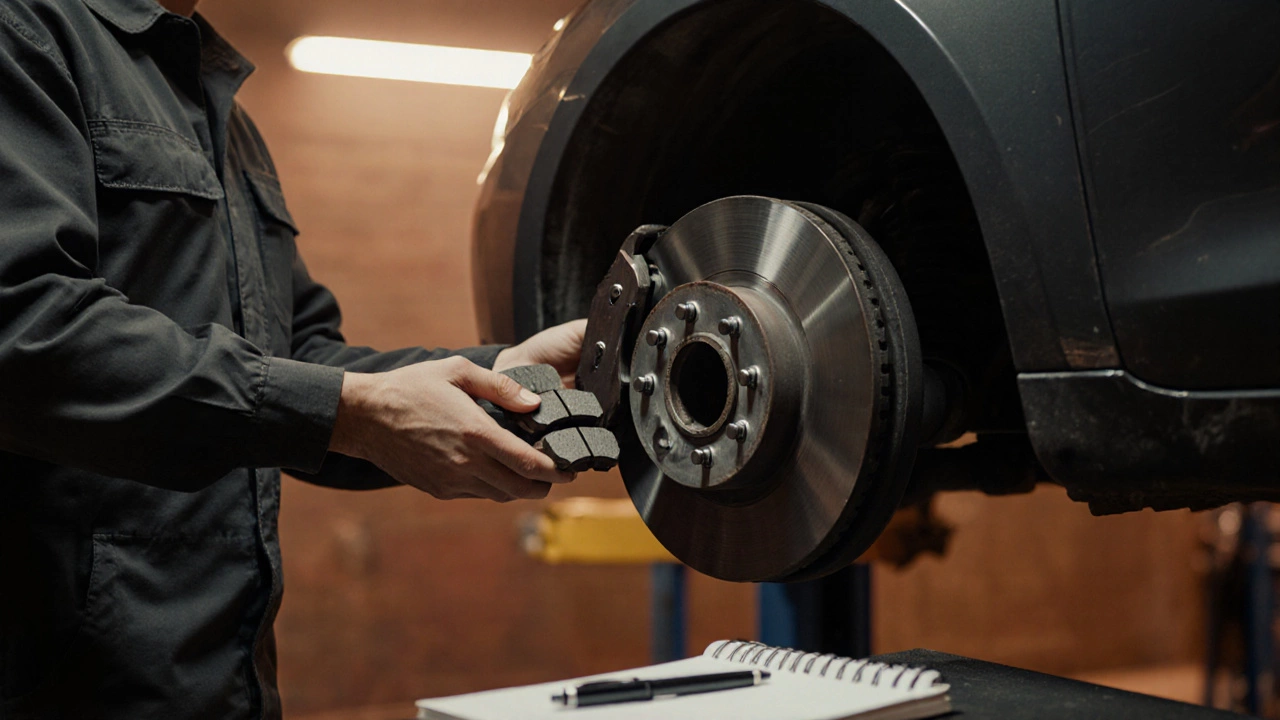
- Locate the Brake Caliper. It’s the clamping mechanism that houses the pads.
- Peer through the open spokes. The Brake Pad will appear as a rectangular block pressed against the disc. The friction material is the lighter part; the darker metal backing is the rest of the pad.
- Measure the thickness of the friction material. Use a ruler or a dedicated pad‑thickness gauge if you have one.
Most manufacturers recommend replacing pads when the friction material is 3 mm (about 1/8 inch) or less. Some premium pads wear down to 2 mm before they start to affect performance.
Measuring Pad Thickness Accurately
If you’re unsure about the numbers, here’s a quick method that doesn’t require fancy tools:
- Place a thin piece of cardboard or a credit‑card‑size shim against the pad.
- Mark the edge of the pad on the shim with a permanent marker.
- Remove the shim and measure the distance from the edge of the shim to the mark with a ruler. That gives you the pad thickness.
Write the measurement down for each wheel so you can compare before and after the next service.
When to Call a Professional
Even a seasoned DIYer knows when to hand the job off. Call a qualified Mechanic if you encounter any of the following:
- The disc looks scored, nicked, or uneven - it may need resurfacing or replacement.
- You notice a leak from the Brake Fluid reservoir or a spongy pedal.
- The caliper pistons are stuck or the slide pins don’t move smoothly.
- You’re uncomfortable removing the wheel or working around the brake hardware.
Professional service also ensures the brake wear sensor (if your car has one) is reset after the pads are swapped.
Common Mistakes to Avoid
Learning by doing is great, but watch out for these pitfalls that can turn a simple check into a costly repair:
- Relying on the squeal alone. Some pads are designed to be silent, so don’t assume they’re fine just because they’re quiet.
- Measuring the backing plate instead of the friction material. The metal side can be over 10 mm thick, which would give a false sense of safety.
- Skipping the wheel removal. Trying to view the pads through a tight wheel can lead to misreading the wear.
- Forgetting to reset the brake wear sensor. Some newer Vehicle models will illuminate a warning light if the sensor isn’t cleared.
Quick Checklist Before You Drive Off
| Item | What to Look For | Action Needed |
|---|---|---|
| Noise | Squeal, grinding, or silence | Replace if grinding; investigate squeal if present |
| Pad Thickness | ≥3 mm (good), 2‑3 mm (monitor), ≤2 mm (replace) | Swap pads when ≤3 mm |
| Pedal Feel | Soft, spongy, or firm | Inspect pads & fluid if soft |
| Rotor Condition | Scored, warped, or smooth | Resurface or replace rotor if damaged |
| Wear Sensor Light | Dashboard warning illuminated | Reset sensor after pad replacement |
Running through this table every 6 months (or every 10 000 miles) keeps you ahead of costly brake repairs.
Final Thoughts
Checking your brake pads is one of the simplest maintenance tasks you can do on your own. A quick visual inspection, a basic thickness measurement, and an ear for unusual noises go a long way toward staying safe on the road. Keep a small notebook in your glove box, jot down each wheel’s thickness, and you’ll always know when it’s time for fresh pads. And remember: when in doubt, let a trained Mechanic take a look - it’s cheaper to replace pads than to replace a warped disc or rebuild a brake system.
How often should I check my brake pads?
A visual check every 6 months or every 10 000 miles is a good rule of thumb. If you hear squealing or notice a soft pedal, inspect immediately.
Can I drive safely with pads that are 3 mm thick?
Yes, 3 mm is generally considered the lower safe limit. Plan to replace them before they drop below 2 mm to avoid reduced braking efficiency.
What does a brake wear sensor do?
The sensor monitors pad thickness. When the pads wear past a preset point, it triggers a warning light on the dashboard. It does not replace the pad; it simply alerts you.
Do I need special tools to measure pad wear?
A simple ruler or a dedicated brake‑pad thickness gauge works fine. Some kits include a plastic gauge that snaps onto the pad for a quick read.
Is it normal for brakes to make a squealing sound after a wet day?
Yes, moisture can cause a brief squeal as the pads re‑seat on the disc. If the noise persists once the brakes have warmed up, inspect the pads for wear.